You missed the live.
You can still paint with us.
On March 13, hundreds of jewellery lovers painted alongside us in real time on Instagram.
And the result? A royal jewel,rendered in gouache, step by step, from scratch.
The replay is waiting for you. But first, get your template.
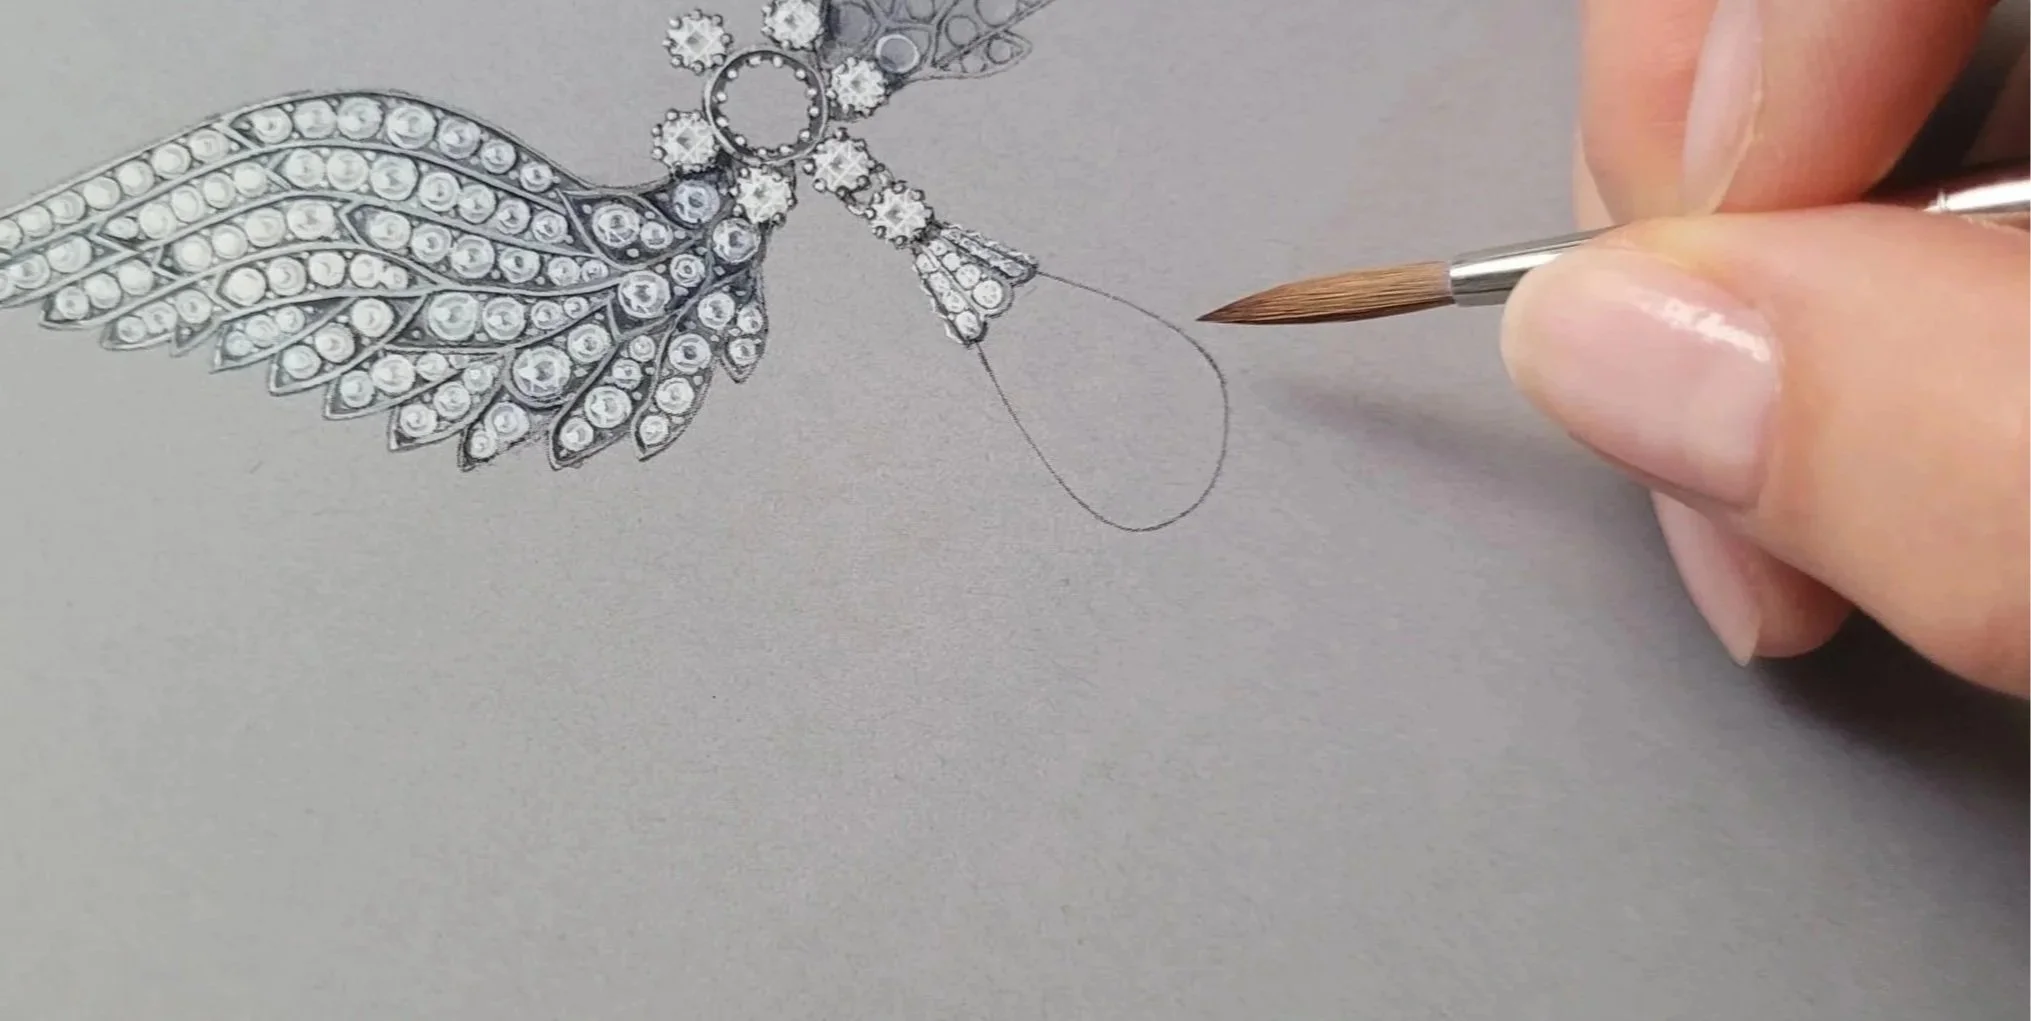
The Jewel : A Piece Worth Painting
We have chosen an extraordinary brooch from the Al Thani Collection, one of the most celebrated private jewellery collections in the world. This piece is currently on display at the Joyaux Dynastiques exhibition, Hôtel de la Marine, Paris, until April 6, 2026.
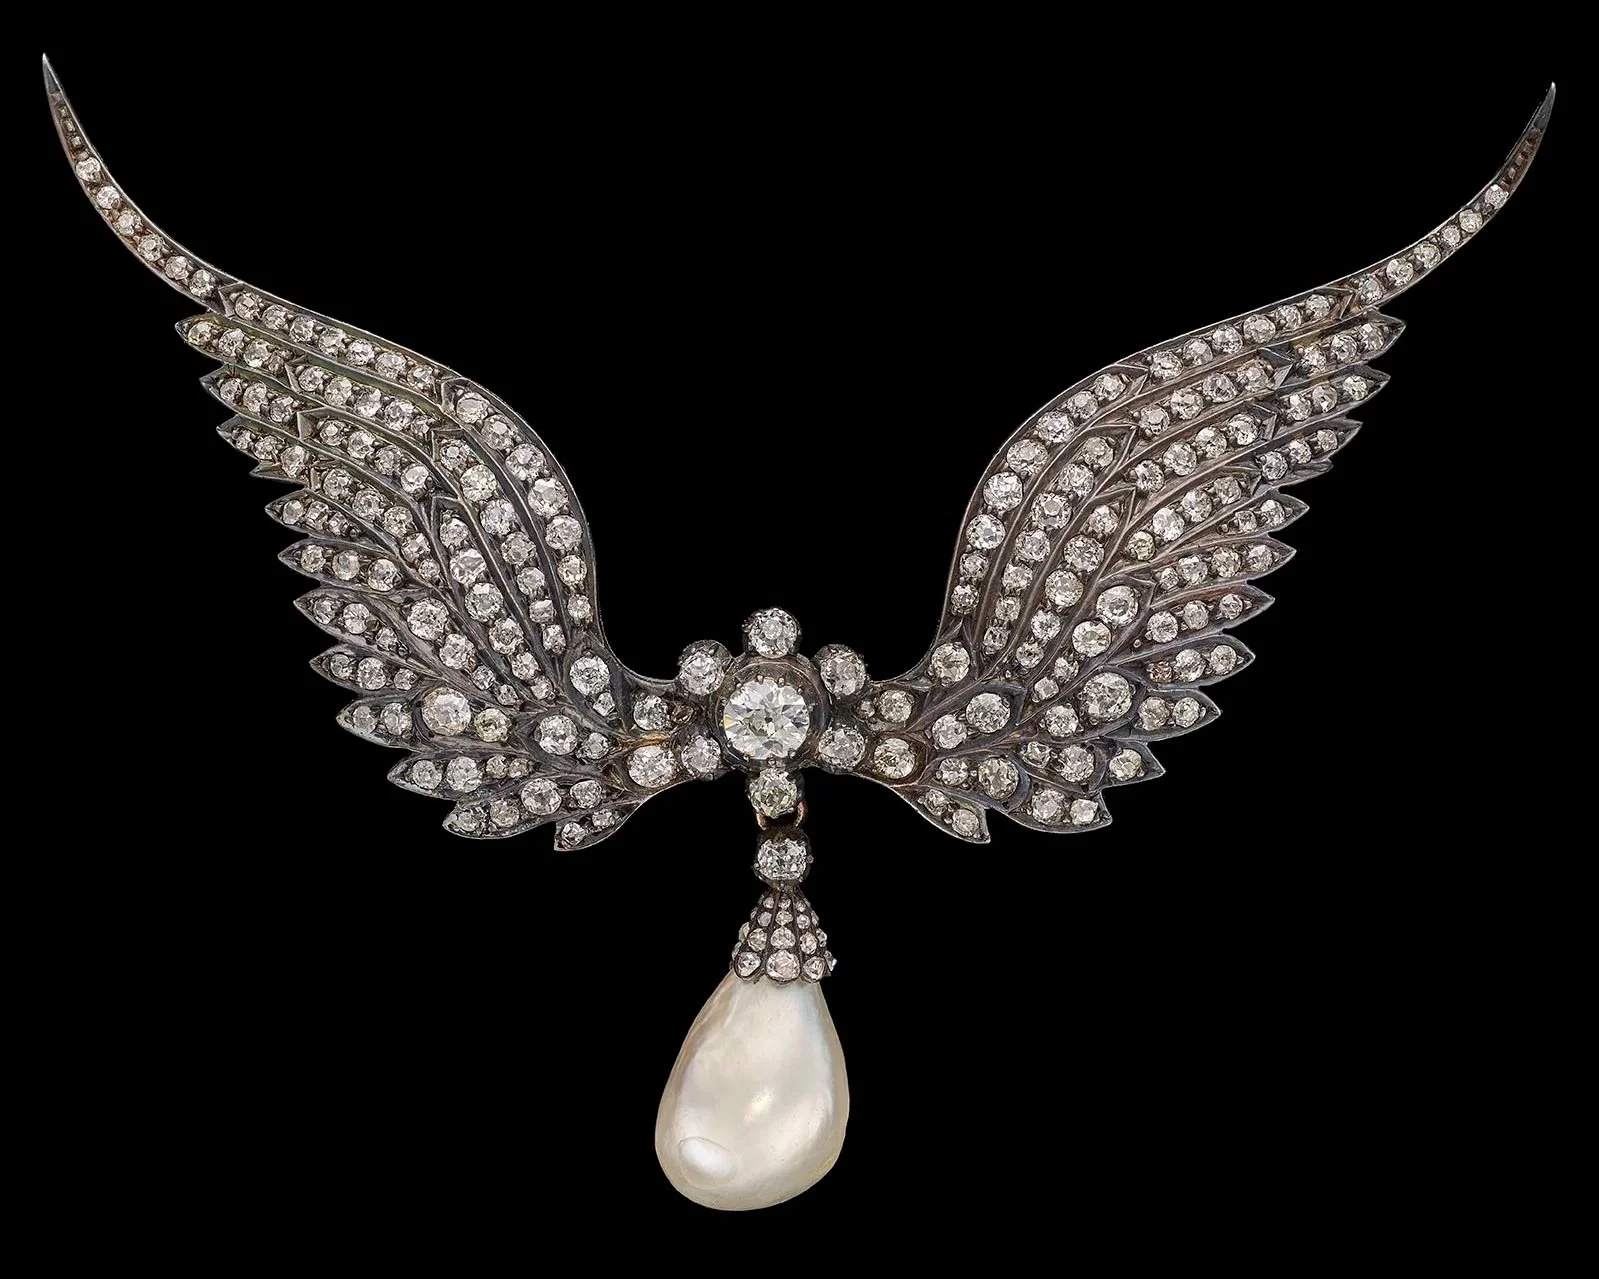
A winged brooch
Russia, circa 1890
Diamonds, pearl, silver, gold - 8.5 x 10.5 x 0.5 cm
A jewel that moves, breathes, and rewards every closer look. The perfect subject to train your eye, challenge your hand, and deepen your understanding of high jewellery representation.
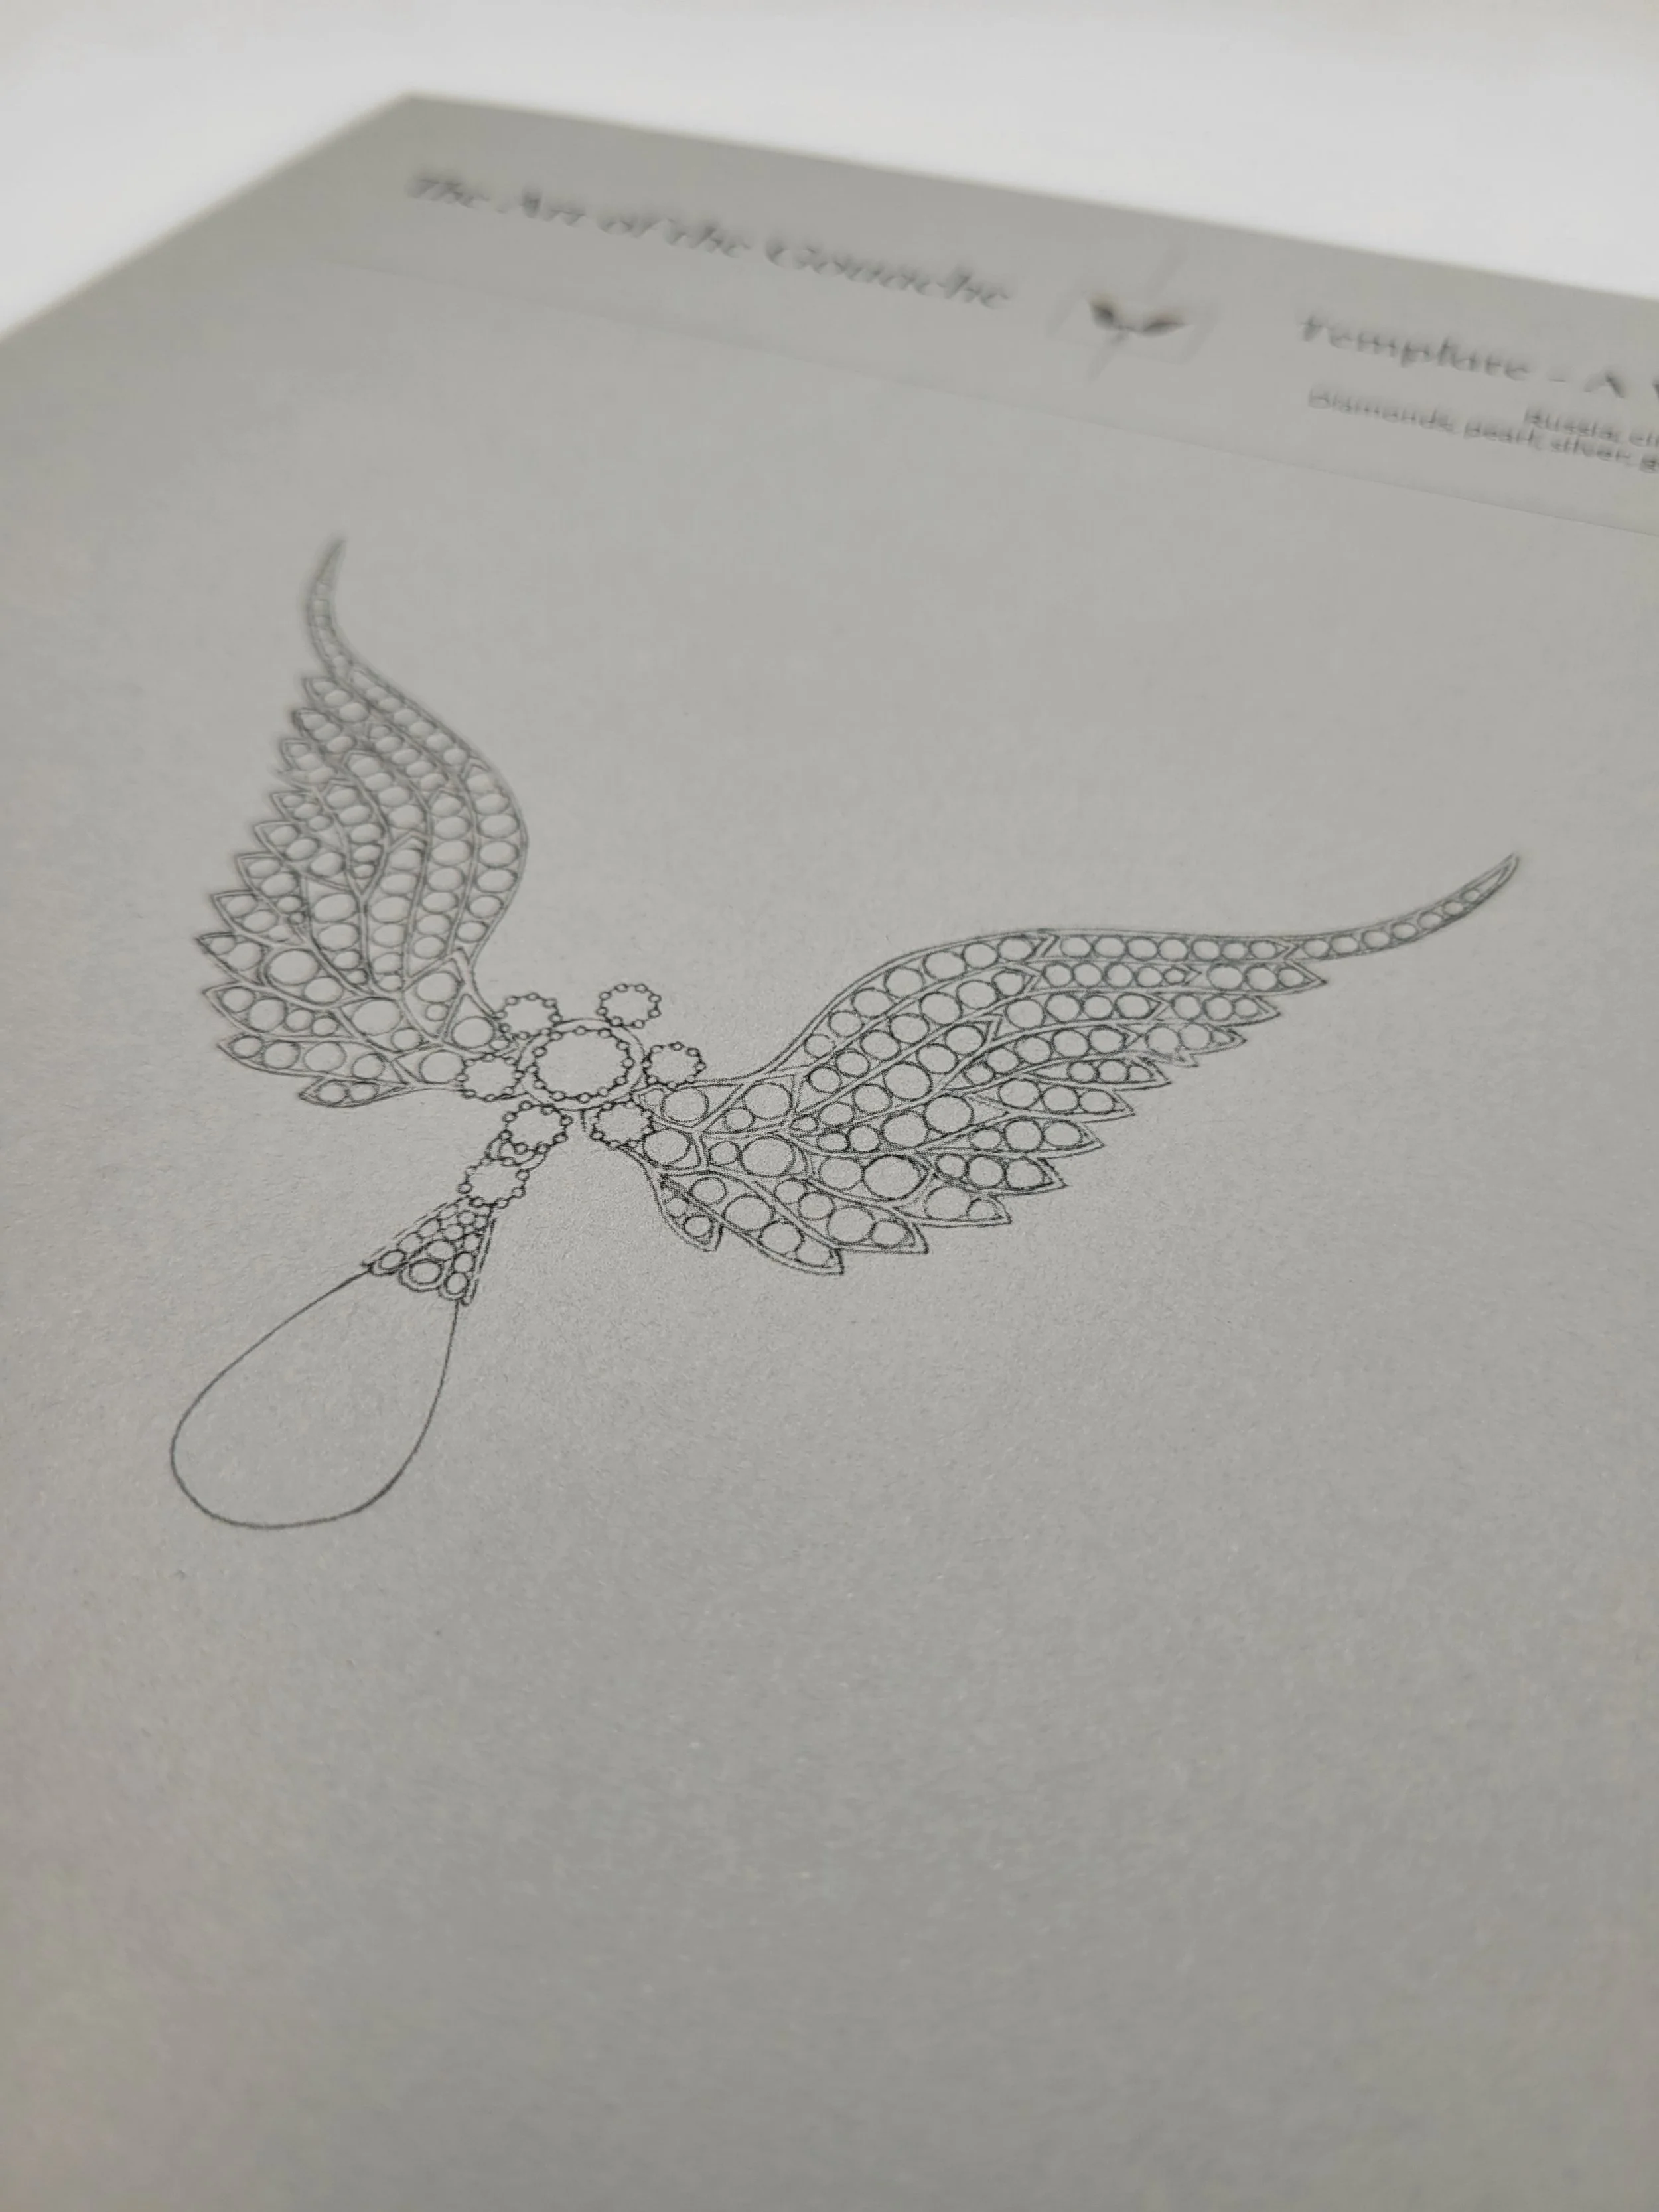
Download Your Template: It is Free
We know that facing a complex jewel on a blank page can feel overwhelming. So we've done the tracing for you in a free template.
You can now focus entirely on colour, technique, and the joy of painting.
To receive your free template : just fill in the form.
No credit card required. No spam. Instant access. Join +2500 jewellery lovers already painting with us.
What You Will Need
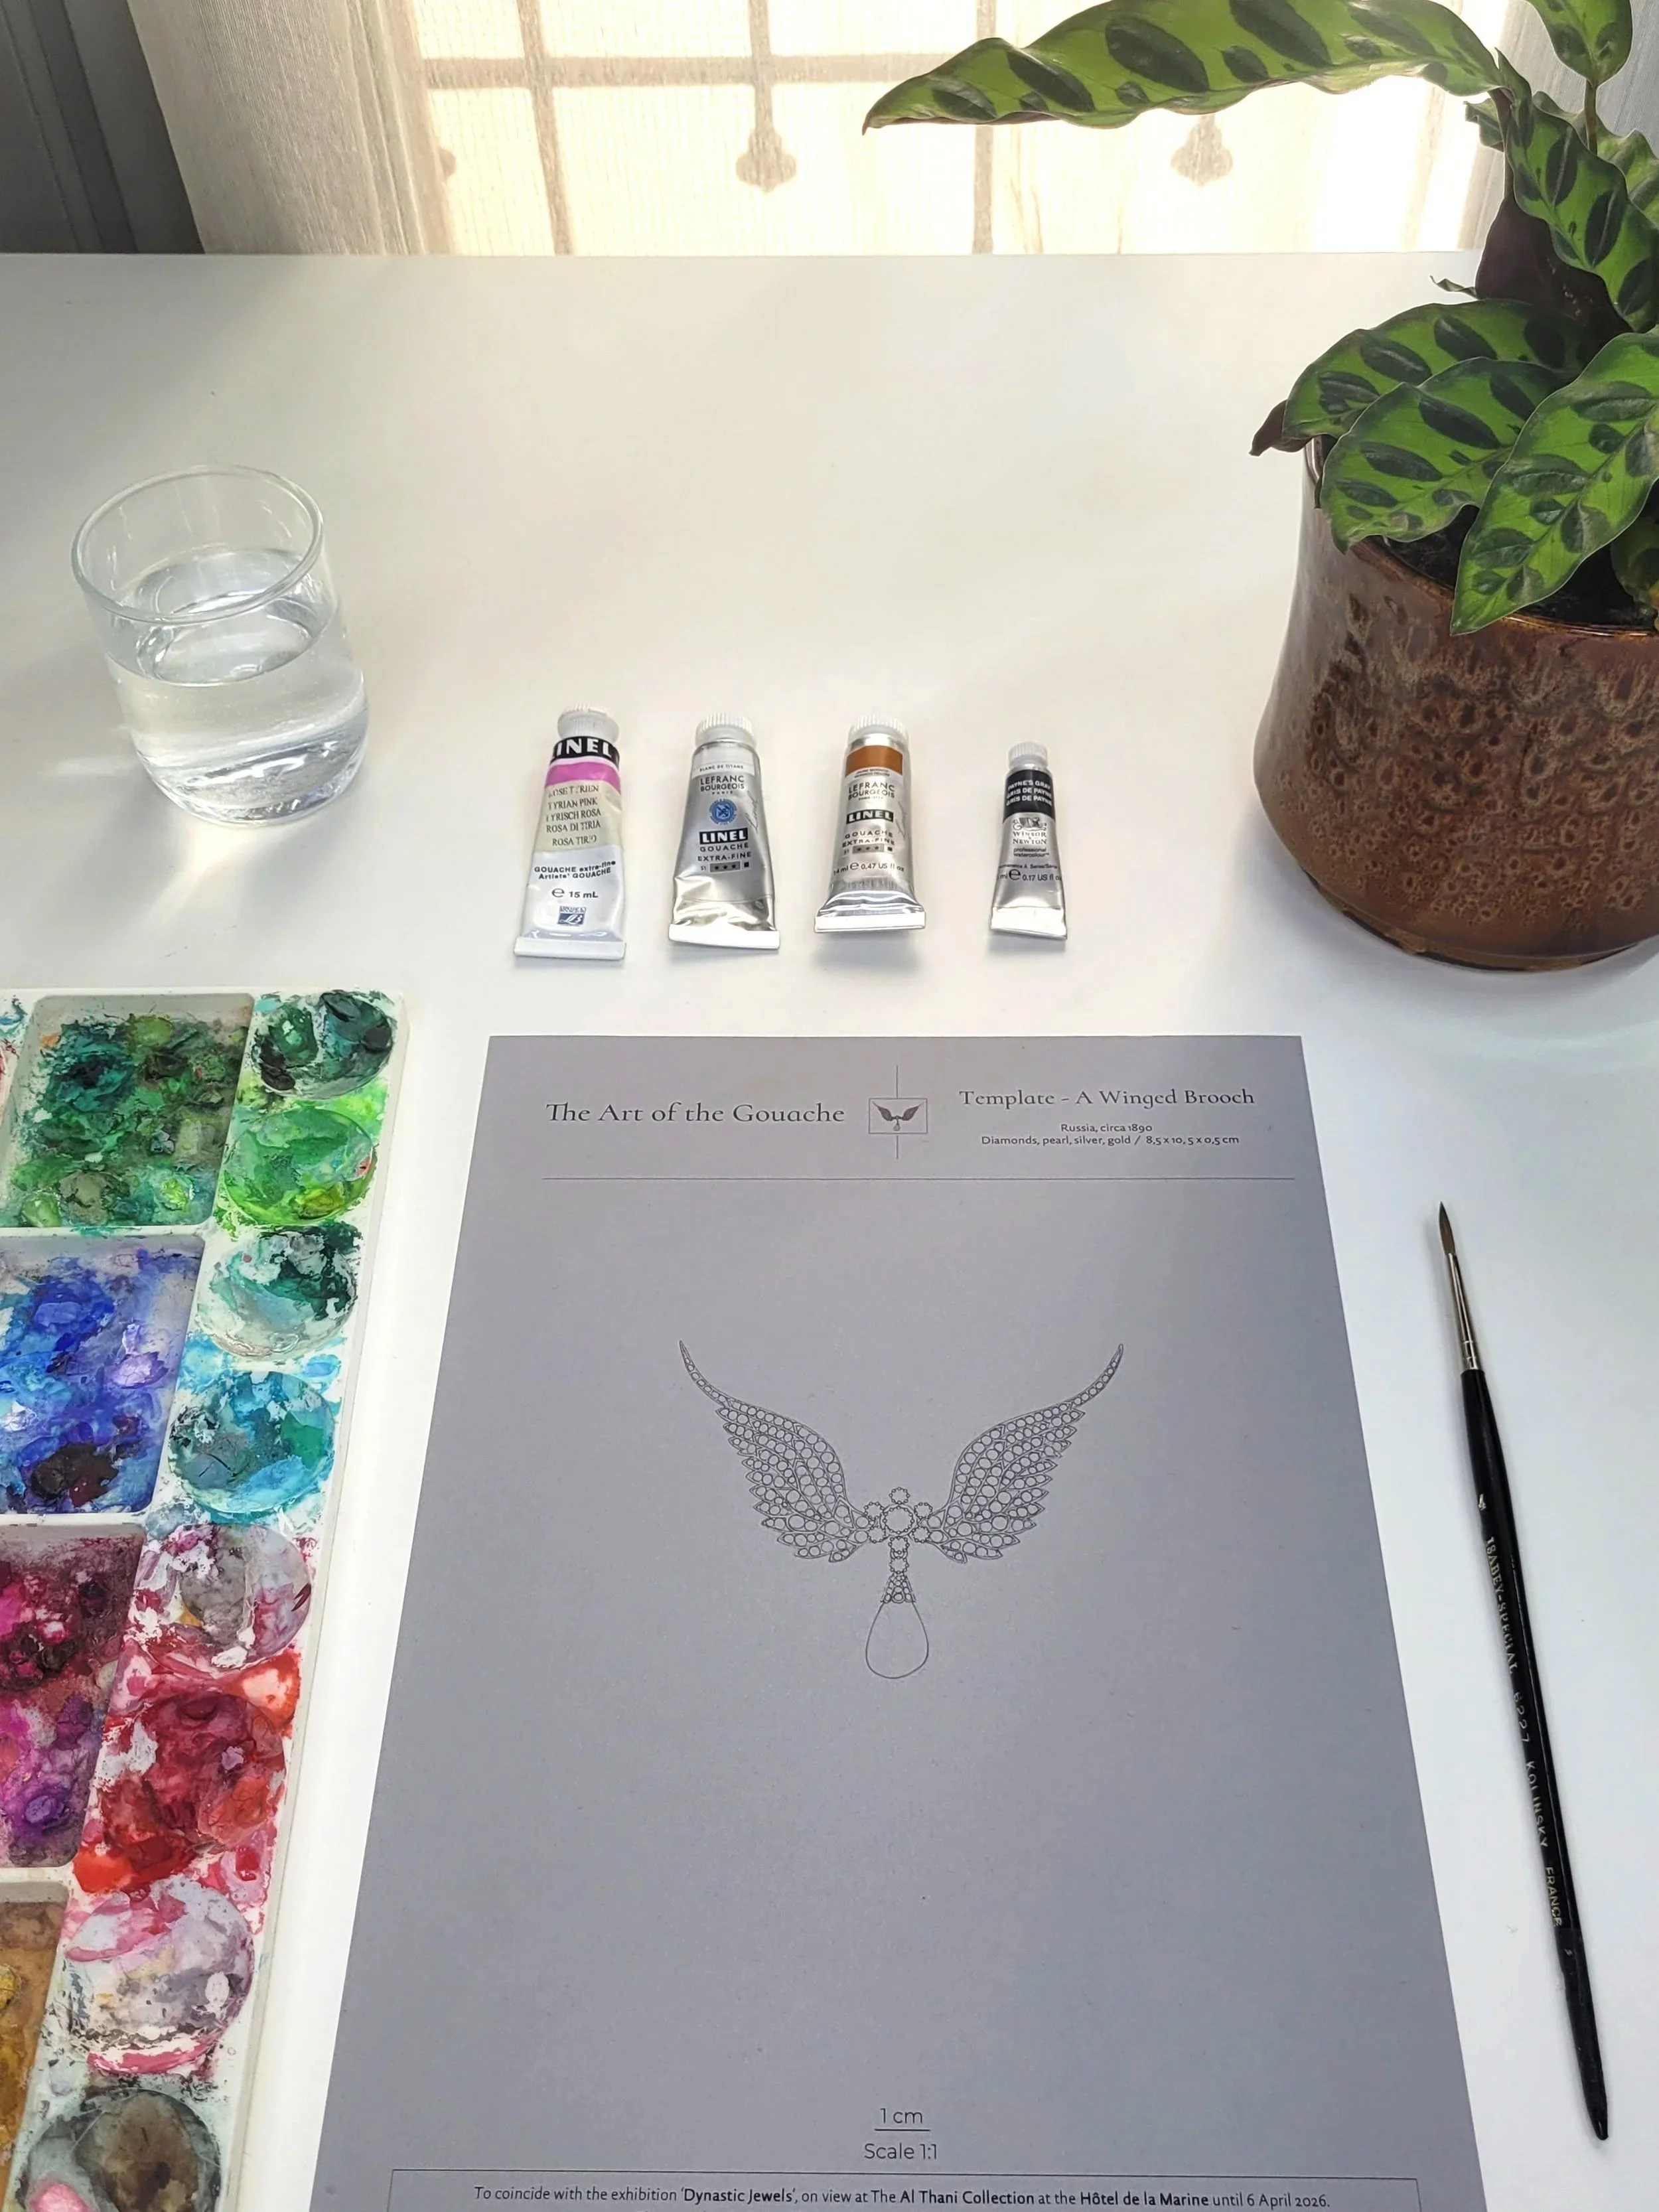
Simple materials. No expensive setup.
Printed template on thick smooth grey paper (min. 160g/m²)
Thick grey draft/scratch paper
Absorbent paper
A thin watercolor brush
A palette
A jar filled with water
Watercolor: Payne's grey
Gouache paints: white, pink, orange
That's it. Your template does the rest.
Before Your Press Play, Prepare Your Template
There's one thing we ask you to do before watching the replay.
Apply a white wash to your printed template.
What is a white wash?
A white wash is a thin, diluted first wash of gouache laid evenly across the whole surface. It creates a neutral base that makes every layer you add look richer and more controlled. It is a foundational technique in jewellery gouache, and once you've done it, you'll never skip it.
How to make a wash?
Watch The Replay
Replay Live - Part I
Replay Live - Part II
Ready To Go Further?
In this video, you painted diamonds, pearls and pavé. We hope you enjoyed it!
If you want to go further, we have a course dedicated to each technique:
Diamonds & Pearls → The Art of the Gouache: A complete jewelry gouache rendering course: multi-gemstones and multi-metals.
Pearls → Pearls: A dedicated course to capture the iridescent shimmer of pearls and mother-of-pearl with professional techniques.
Pavé → Perfect your Pavé: The most valued specialization in jewelry design. Learn to master every type of pavé setting with precision and confidence.
About Us

We are Hélène and Jeanne Karpov, twin sisters and professional jewellery gouache artists. For over 20 years, we have worked for the greatest Maisons of Paris' Place Vendôme: Van Cleef & Arpels, Hermès, Boucheron, and many others brands from LVMH, Kering, Richemont
On March 13, we will open our studio to the world.
No prior level required. Just your brushes, your template, and the pleasure of painting alongside thousands of jewellery lovers.
We can't wait to paint with you!
Hélène & Jeanne
Your Questions, Answered
-
For this demonstration we used Tyrian pink, subtly mixed with a touch of orange to obtain a soft, creamy and slightly desaturated tone.
You do not need to own the exact same pigment. The key is to create a delicate, low-saturation pink.
Working with the colors you already have is perfectly acceptable. Mastering the balance of tones is far more important than owning a specific pigment.
-
Yes. We usually print our drawings using a laser printer, which is the safest option because the ink does not react with water.
Inkjet printers can also work, but please note that the ink may dissolve when it comes into contact with water, which can slightly alter your drawing once you begin painting.
-
Absolutely.
You can mix your watercolors with white gouache to create the opaque effect required for the pearl.
-
Drying time mainly depends on the amount of water used.
In most cases, gouache dries within a few minutes.
A simple way to check is to observe the paper:If the paper is still warped or swollen, it likely contains excess moisture.
You can gently tap the surface with your fingertip to confirm that it is completely dry before continuing.
-
Yes, and this is an important point.
Working on a slightly tilted surface (around 35–40°) greatly improves posture and reduces strain on the neck, shoulders and back, especially during long painting sessions.
A table easel is one of the best investments you can make if you intend to practice gouache regularly.
-
Yes.
We frequently use plastic templates with common gemstone cuts to ensure accurate proportions.
You will find recommended references in our free gouache supply list.For certain projects we may also use Photoshop or Illustrator to create perfectly clean outlines before printing.
However, it is important to note that the artistic process itself remains entirely hand-painted in gouache.
-
Not at all.
Corrections are part of the learning process and every gouache artist goes through this stage.
You can correct mistakes by:
repainting with the base color
refining shapes with pencil
lightly lifting paint with water and blotting paper
allowing the surface to dry before repainting
Jewelry gouache is built layer by layer, and adjustments are completely normal.
-
We used to work with a grey paper produced by Antalis, which is unfortunately no longer manufactured.
The important characteristics are:
Grey toned paper
Smooth surface
Minimum weight of 160 g/m²
We also recommend a suitable alternative in our free materials guide for jewelry gouache.
-
In major jewelry houses, designers often have the opportunity to see the gemstones in person, observing their color, cut etc.
This is invaluable when translating the stone into gouache.
However, when stones are not physically available, artists may work from high-quality photographs or gemological certificates such as those from the GIA.
-
We prefer not to answer this question in purely numerical terms.
The time required to complete a gouache is never simply the number of hours spent painting.
It is the result of years of observation, practice, experimentation and refinement.Naturally, today we paint much faster than when we first began.
So if we had to answer honestly:
this type of piece can take anywhere from a few hours… to twenty years of experience. -
Very few books exist on this highly specialized discipline, which is precisely why we published one ourselves.
Some jewelry houses also produce rare collection catalogues that contain beautiful gouache illustrations.
Another reference often mentioned is:
The Art of Jewelry Design - Galli, Rivière, Li
However, keep in mind that many of the techniques described date from the 1990s, and the aesthetics and gouache techniques used in Place Vendôme today have evolved significantly.
-
Absolutely.
Jewelry gouache remains one of the most powerful tools for communicating a design. It allows a client to visualize a piece long before it is created.
Digital renderings and AI can be useful tools, but they rarely convey the emotion, refinement and craftsmanship expected for pieces worth tens or hundreds of thousands of euros.
This is precisely why the great houses continue to rely on hand-painted gouache.
A designer who masters this technique holds a distinct advantage.
-
Yes, you can.
However, we personally prefer Titanium White for jewelry gouache because of its:
exceptional opacity
luminosity
ability to create brilliant highlights
If you have the opportunity, we recommend trying both and comparing them yourself.
-
Yes, although it is a highly specialized profession.
Some jewelry houses employ dedicated gouache artists, while others expect designers themselves to master the technique.
In any case, developing strong gouache skills can open doors in:
high jewelry design studios
timepieces studios
private commissions
-
The best starting point is the cabochon cut. We teach it in our course The Art of the Gouache.
Its smooth surface allows beginners to focus on:
controlling gouache texture
understanding light and volume
building smooth gradients
Once comfortable with cabochons, the next step is typically the brilliant cut, which introduces faceting.
More complex cuts such as emerald and princess cuts usually come later, as they require greater precision and control.